

Founder of Travel Camera Truth and Big T Honest Reviews, sharing honest, practical camera and travel-gear guidance based on real-world use.
Last updated: September 21, 2026
Affiliate disclosure: This article contains affiliate links. If you buy through them, I may earn a commission at no extra cost to you. As an Amazon Associate I earn from qualifying purchases.
Quick Answer
National park photography without hiking is possible at roadside overlooks, designated pullouts, and viewpoints close to parking. Start with Badlands Loop Road, Yellowstone’s canyon overlooks, Yosemite’s Tunnel View, or Bryce Canyon’s rim viewpoints. Some views are beside the car; others require a short walk with slopes or steps. This guide compares eight photo stops across six parks, then explains timing, camera settings, and safe roadside photography. Check each park’s official conditions and accessibility information before you travel.
Key Takeaways
- Overlooks were built for views, not for athletes. Many scenic viewpoints are close to parking, but the distance and surface vary by stop.
- "Short walk" and "wheelchair accessible" are different things. A viewpoint 100 feet from the curb can still have steps, loose gravel, or a steep grade. Check the park's accessibility page, not just the map.
- Badlands National Park and Yellowstone are two of the strongest options for easy national park photo spots, with scenic overlooks and designated pullouts along their main park roads.
- Timing beats distance. Good light at a roadside overlook can matter more than how far you walk.
- Put safety before the photograph. Park only in designated pullouts, stay behind railings, keep off roadside vegetation, and follow each park's wildlife-distance rules.
- A modern phone is enough for wide scenic views. A telephoto lens matters mostly for wildlife and for compressing distant peaks.
- A tripod is optional in daylight and useful at dawn, dusk, and for long exposures.
- Bring a lens cloth. Dust and fingerprints on a lens can cause soft, hazy photos.
What are the best national park viewpoints you can drive to?
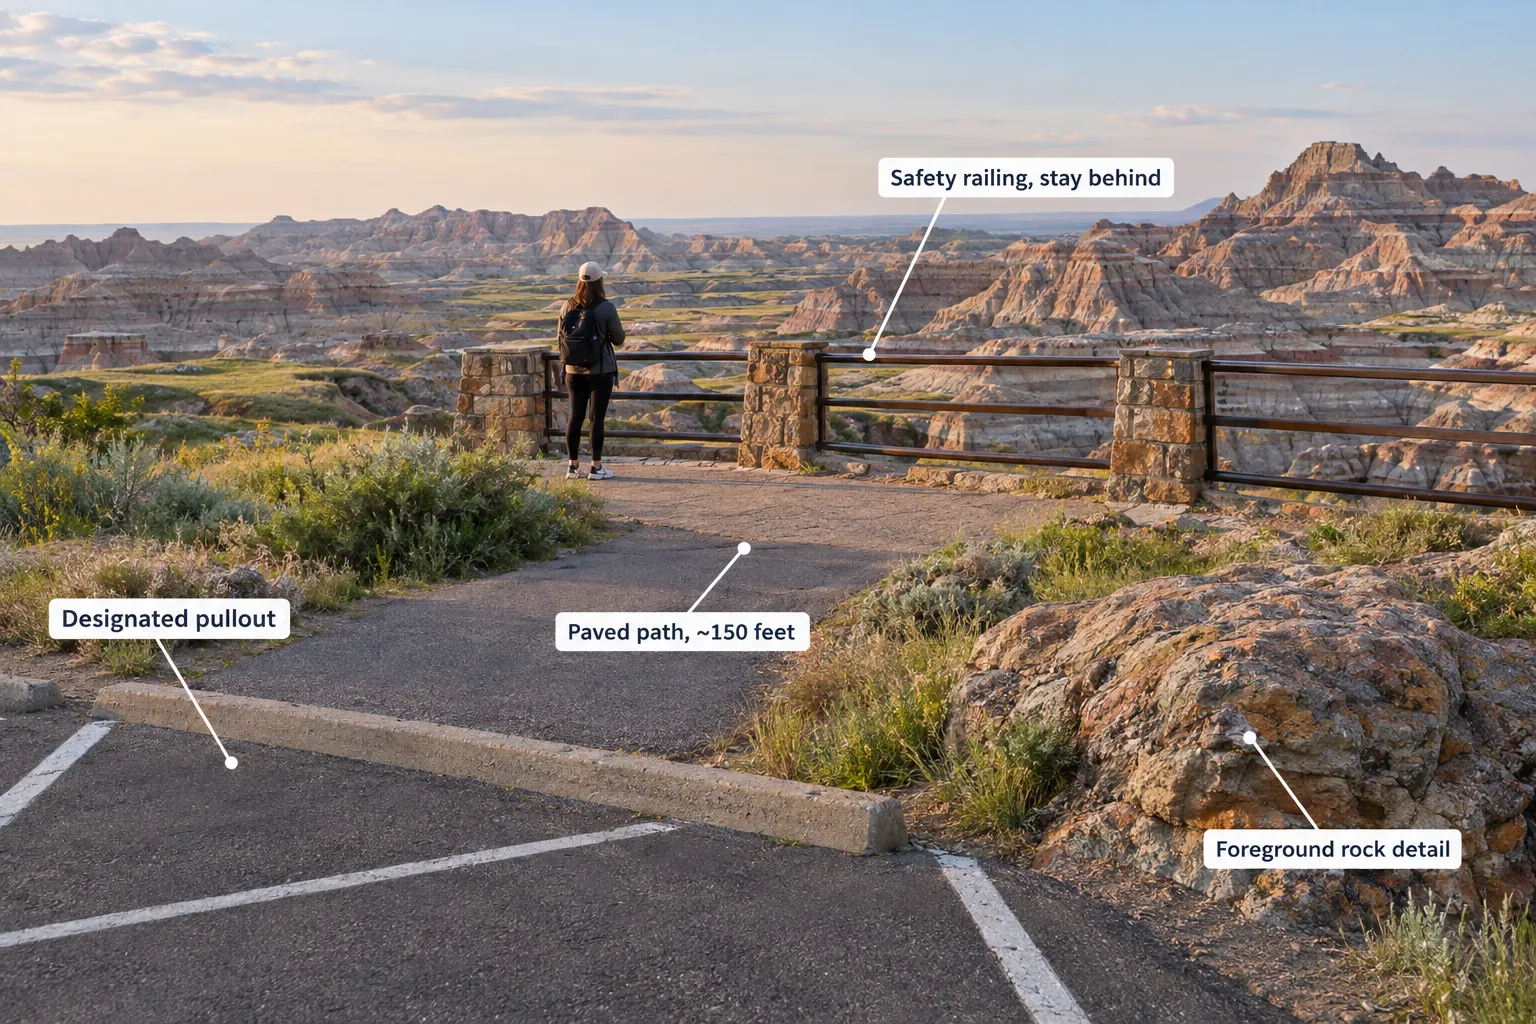
Look for a designated parking area, an interesting subject, and a route that suits your walking needs. The table covers eight viewpoints across six parks. Distances depend on where you park and which viewing area you use; where an official measurement was not confirmed, the table describes the approach instead of guessing. A short walk does not guarantee a level or wheelchair-accessible route.
| Park & viewpoint | What you can photograph | Walk from parking | Surface / steps | Access notes |
|---|---|---|---|---|
| Badlands, Big Badlands Overlook | Eroded spires, sunrise side light, wide layered panorama | Short walk from the lot; confirm the route | Parking and overlook approach; check boardwalk access | Popular at sunrise; lot fills fast in summer |
| Badlands, Yellow Mounds Overlook | Yellow and maroon banded hills, great in overcast light | Essentially at the car | Paved pullout, some uneven shoulder | Off Badlands Loop Road (SD Hwy 240) |
| Yellowstone, Artist Point | Lower Falls and the canyon's yellow walls | Short walk; confirm distance to your chosen platform | Paved path; steps to the upper level | Check the park’s canyon accessibility guidance before visiting |
| Yellowstone, Hayden Valley pullouts | Bison herds, river bends, mist at dawn | Shoot from the pullout | Paved/gravel pullouts, no railings | Obey wildlife distance rules; don't block traffic |
| Yosemite, Tunnel View | El Capitan, Bridalveil Fall, the whole valley | View from parking or a short paved walk | Paved pedestrian viewing area; accessible parking | Use designated crossings and watch for traffic |
| Grand Teton, Teton Point Turnout | Teton range, sagebrush flats, alpenglow | At the turnout | Roadside turnout; confirm the surface and curb access | US-26/89/191 corridor; check current access |
| Glacier, Wild Goose Island Overlook | Island in St. Mary Lake framed by peaks | Steps from the pullout | Parking and an accessible viewing area listed by NPS | Going-to-the-Sun Road; seasonal access |
| Bryce Canyon, Sunset Point | Hoodoo amphitheater, Silent City, warm rim light | About 494 ft (150 m) one way, per NPS | Paved, level approach; some grade variation | High elevation; take it slow |
A few more worth exploring: Valley View in Yosemite offers a roadside perspective on the Merced River and valley cliffs. Park Avenue Viewpoint and Balanced Rock in Arches offer views close to the main road; walking farther changes the perspective. At Grand Canyon, NPS photography guidance highlights South Rim viewpoints including Mather Point, Hopi Point, Yaki Point, and Desert View. Some require shuttle travel and a walk from the stop, so check the route before choosing your photo location.
If a viewpoint has a name, a sign, and a parking lot, someone decided it was worth photographing. Start there.
Watch: Best Things to Do in Yellowstone National Park Wyoming (Our Top 10)
Use this general park overview for inspiration, then choose stops that match your walking needs. It is not a guide to wheelchair access or a guarantee that every attraction is hiking-free.
National park photography without hiking: scenic drives to consider
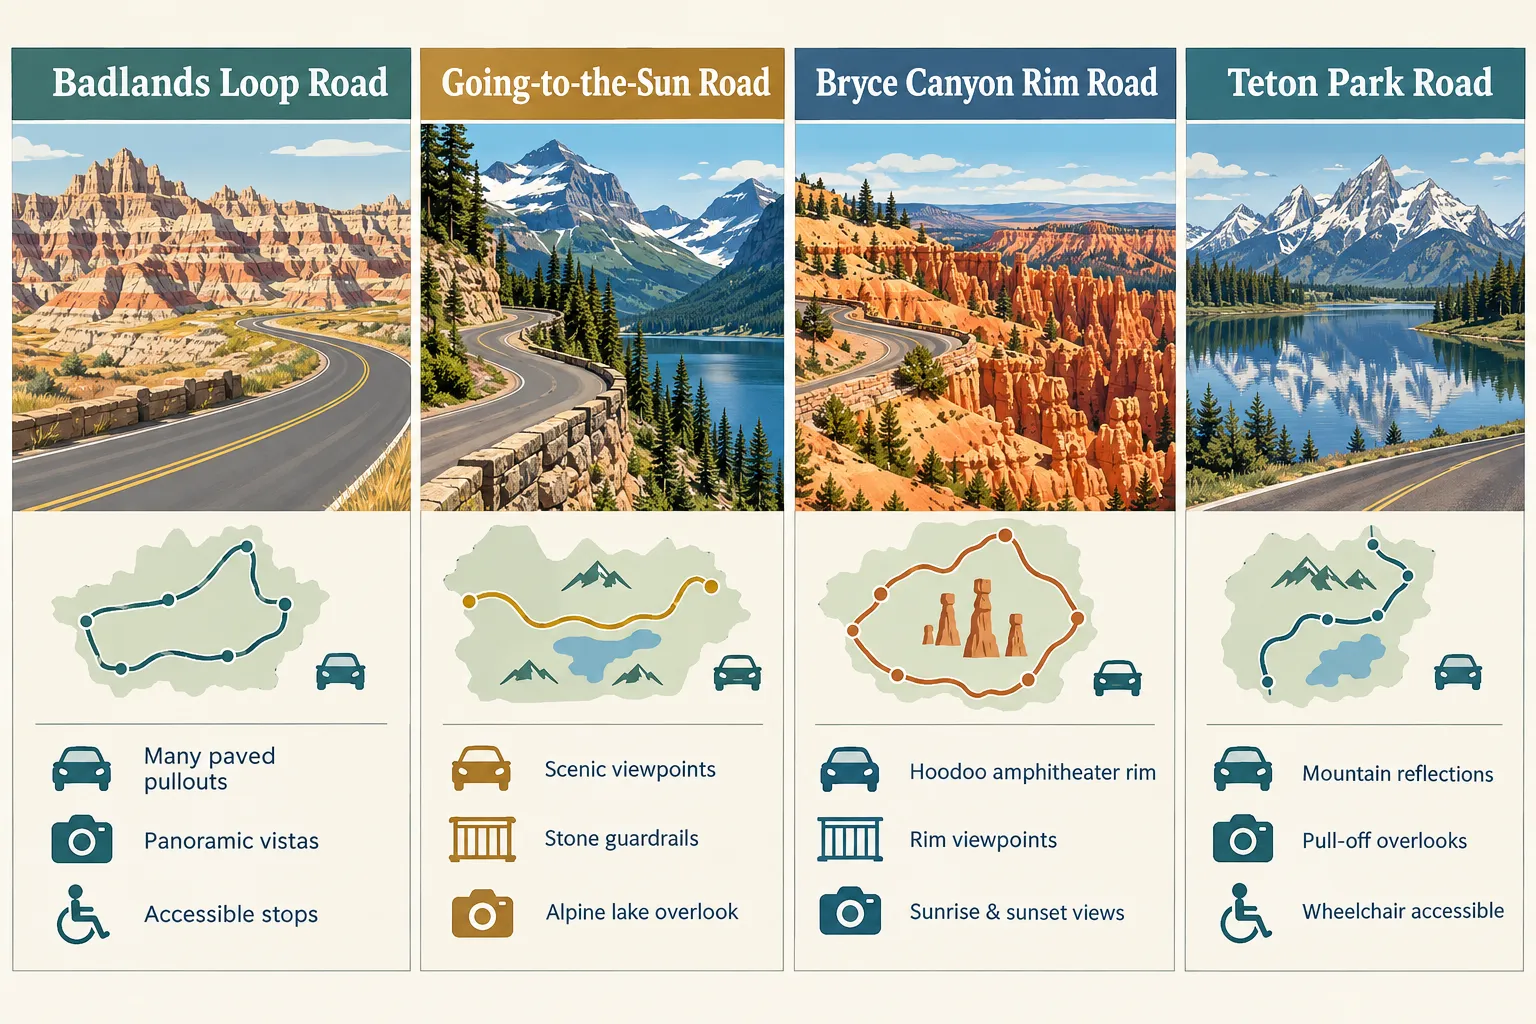
For national park photography without hiking, scenic drives make a useful starting point. Badlands, Glacier, Grand Teton, Bryce Canyon, Shenandoah, and Acadia offer roadside views or short approaches from their main scenic routes. Yellowstone has a larger road network, so leave extra time between stops.
- Badlands Loop Road (South Dakota): a scenic route with numerous signed overlooks; check the approach and surface at each stop.
- Going-to-the-Sun Road (Glacier): alpine lakes, hanging valleys, and glacier views from pullouts, with vehicle-size restrictions and a short summer season.
- Bryce Canyon rim road: Sunset Point has a short paved approach; Sunrise and Bryce Points have different distances and grades. At Inspiration Point, the upper viewpoints involve a steeper, unpaved route. Check Bryce Canyon’s detailed access guide. If you're weighing whether Bryce belongs on your route, our detailed Bryce Canyon National Park review walks through what the visit actually feels like.
- Grand Teton's US-191 turnouts: the range rises straight out of the valley floor, so the pullouts do the work for you.
- Shenandoah's Skyline Drive and Acadia's Park Loop Road: dozens of small overlooks, short distances between stops, and lots of pullouts with low walls.
- Yellowstone's Grand Loop: thermal basins, canyon overlooks, and wildlife valleys strung along one figure-eight road.
Decision rule: choose a one-road park if you have limited time or limited walking range. Choose a multi-district park like Yellowstone if you want variety and don't mind more driving.
Watch: Badlands National Park Travel Guide: 24 Hours & 17+ Stops
This travel guide adds context to the Badlands scenic-drive ideas above. Check individual stops before following the itinerary; some activities may involve trails.
Easiest national parks for photography beginners
The easiest parks for beginners are the ones where the subject is obvious and the light is manageable: Badlands, Bryce Canyon, Grand Teton, and Arches. Each gives you a bold, high-contrast shape (buttes, hoodoos, jagged peaks, arches) that reads clearly in a photo even with a basic phone camera. In forests or beside lakes, choose a clear subject such as a tree, reflection, or shoreline curve.
Families often do best in parks with short paved loops and frequent restrooms. Our roundup of top national parks for families in 2026 is a useful starting point when you're picking between them.
Best national parks for photography with limited mobility
Badlands, Grand Canyon’s South Rim, Bryce Canyon, and Grand Teton offer options worth investigating for photographers with limited mobility. Choose individual viewpoints based on your needs rather than assuming an entire park is accessible. Near the road does not mean wheelchair accessible. Curbs, loose surfaces, steps, and slopes can make a short approach difficult.
How to verify before you commit:
- Read the park's accessibility page on nps.gov, not a blog. Start at the NPS accessibility hub and then open the specific park.
- Look for the exact words "accessible," "paved," "level," "boardwalk," or "steps." Parks are usually specific.
- Call or email the visitor center if the page is vague. Rangers know which overlook has a curb cut.
- Ask about accessible parking counts. Accessible spaces may fill during busy periods; ask about alternatives.
- Check for a wheelchair loaner program and, at some parks, vehicle access permits for roads normally closed to cars.
In Badlands, the NPS accessibility page identifies the Fossil Exhibit and Window Trails as accessible boardwalks, along with the first sections of the Door and Cliff Shelf Trails. These offer additional opportunities for close-up scenery without a long hike. Confirm current conditions before setting out.
If you're 62 or older, check eligibility and current terms for a lifetime Senior Pass; here's our look at the national park senior pass and what it covers.
Edge case to plan around: high-elevation parks like Bryce Canyon (rim above 8,000 feet) can leave visitors short of breath on a flat 300-foot path. Elevation, not distance, is often the real limiter.
What's the best time of day to photograph national parks from overlooks?
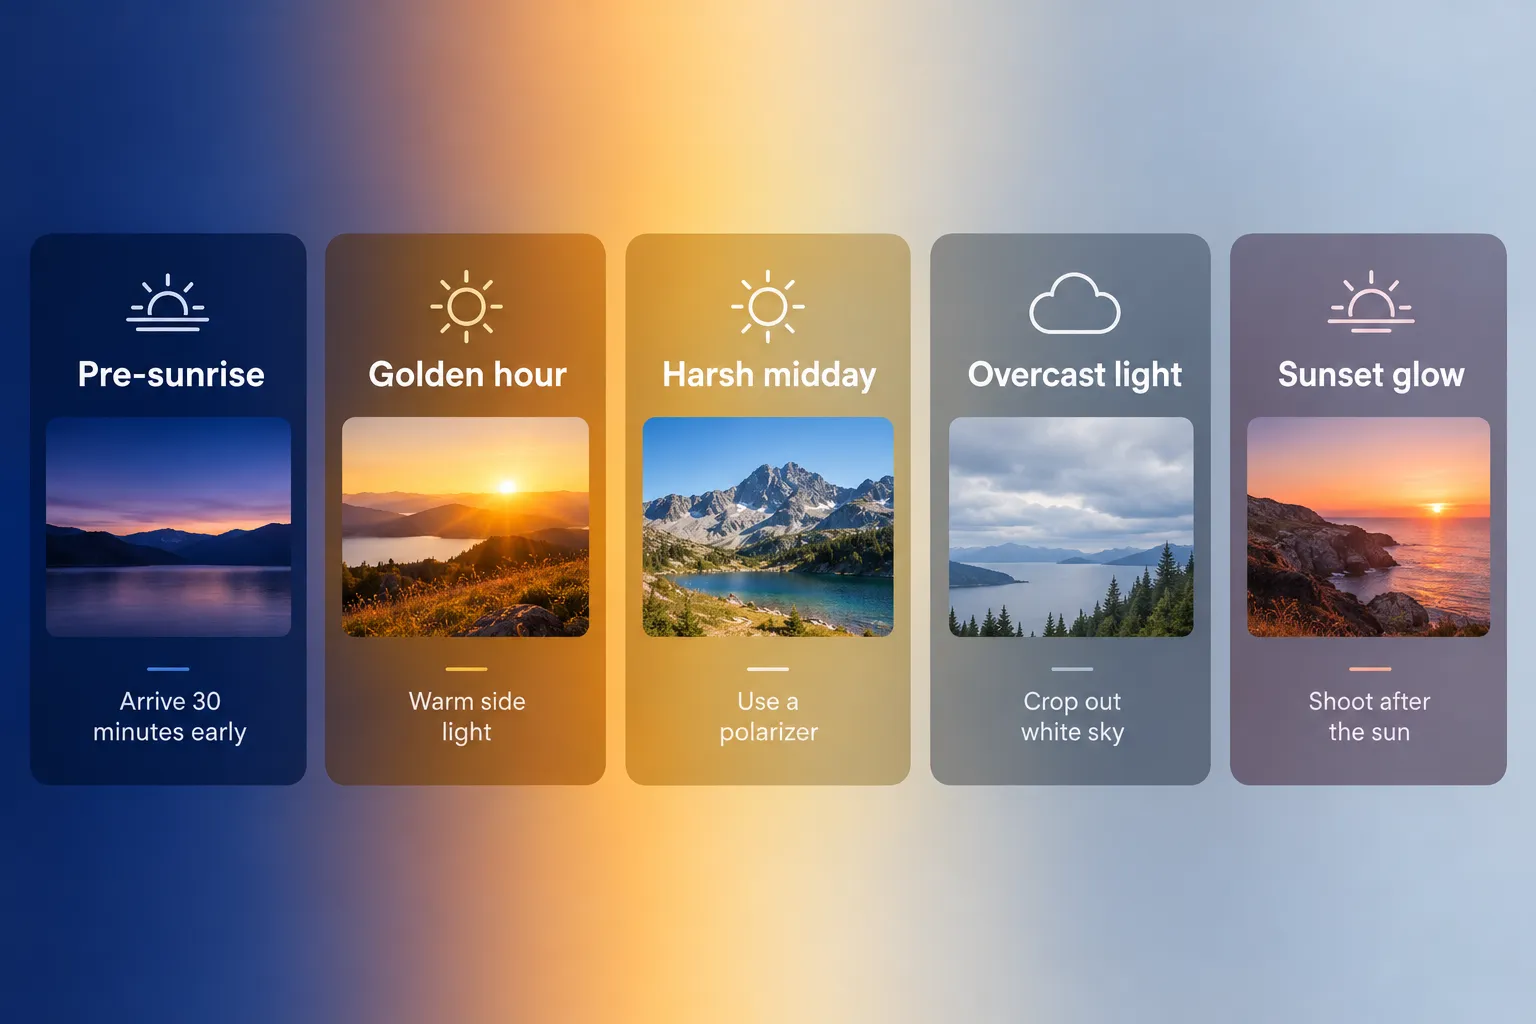
Early morning and late afternoon are useful starting points for softer light and longer shadows. The best timing depends on the direction of the view, season, weather, and surrounding terrain. Check local sunrise and sunset times, then choose a viewpoint where the light falls across your subject. You can still make worthwhile photos at midday.
A practical timing plan:
- Arrive 30-45 minutes before sunrise. The sky often looks best before the sun clears the horizon, but do not assume parking will be available. Bring a light and plan the drive safely.
- Golden hour (first and last hour of sun): warm, directional light. Shoot into the side light, not straight into the sun.
- Blue hour (twilight before sunrise or after sunset): soft, even, slightly cool. Great for canyons and lakes, and you'll want a steady support.
When you can only visit at midday (which is most of us, most of the time):
- Zoom in. Tight compositions of banded rock, a single butte, or a lone tree hold up far better than a wide scene under a white sky.
- A camera polarizing filter can reduce reflections from water and foliage at suitable angles. A phone’s shadow slider adjusts dark areas; it does not remove glare.
- Put something in the shade in the foreground and something sunlit behind it for depth.
- Try black and white. Harsh midday contrast that ruins a color photo can make a strong monochrome one.
- Face away from the sun so the light is behind you and the landscape is evenly lit.
On cloudy days, overcast light is a gift for colorful rock and waterfalls. Badlands' Yellow Mounds and Bryce's hoodoos show their color better without hard shadows. The fix for a flat white sky is simple: compose so there's almost no sky in the frame.
How do you get good photos from roadside pullouts?
Pull fully into a designated parking space and assess the scene before taking out your camera. If traffic, wildlife, and conditions allow, step into the designated viewing area for a clearer view. When animals are nearby, staying inside your vehicle may be safer. Never sacrifice a safe position to avoid window reflections.
The five-step pullout routine:
- Park legally and fully. Use marked pullouts and parking areas only. Yellowstone's official guidance is blunt about this: park in roadside pullouts, don't block traffic, and don't drive onto roadside vegetation. See Yellowstone's photography page.
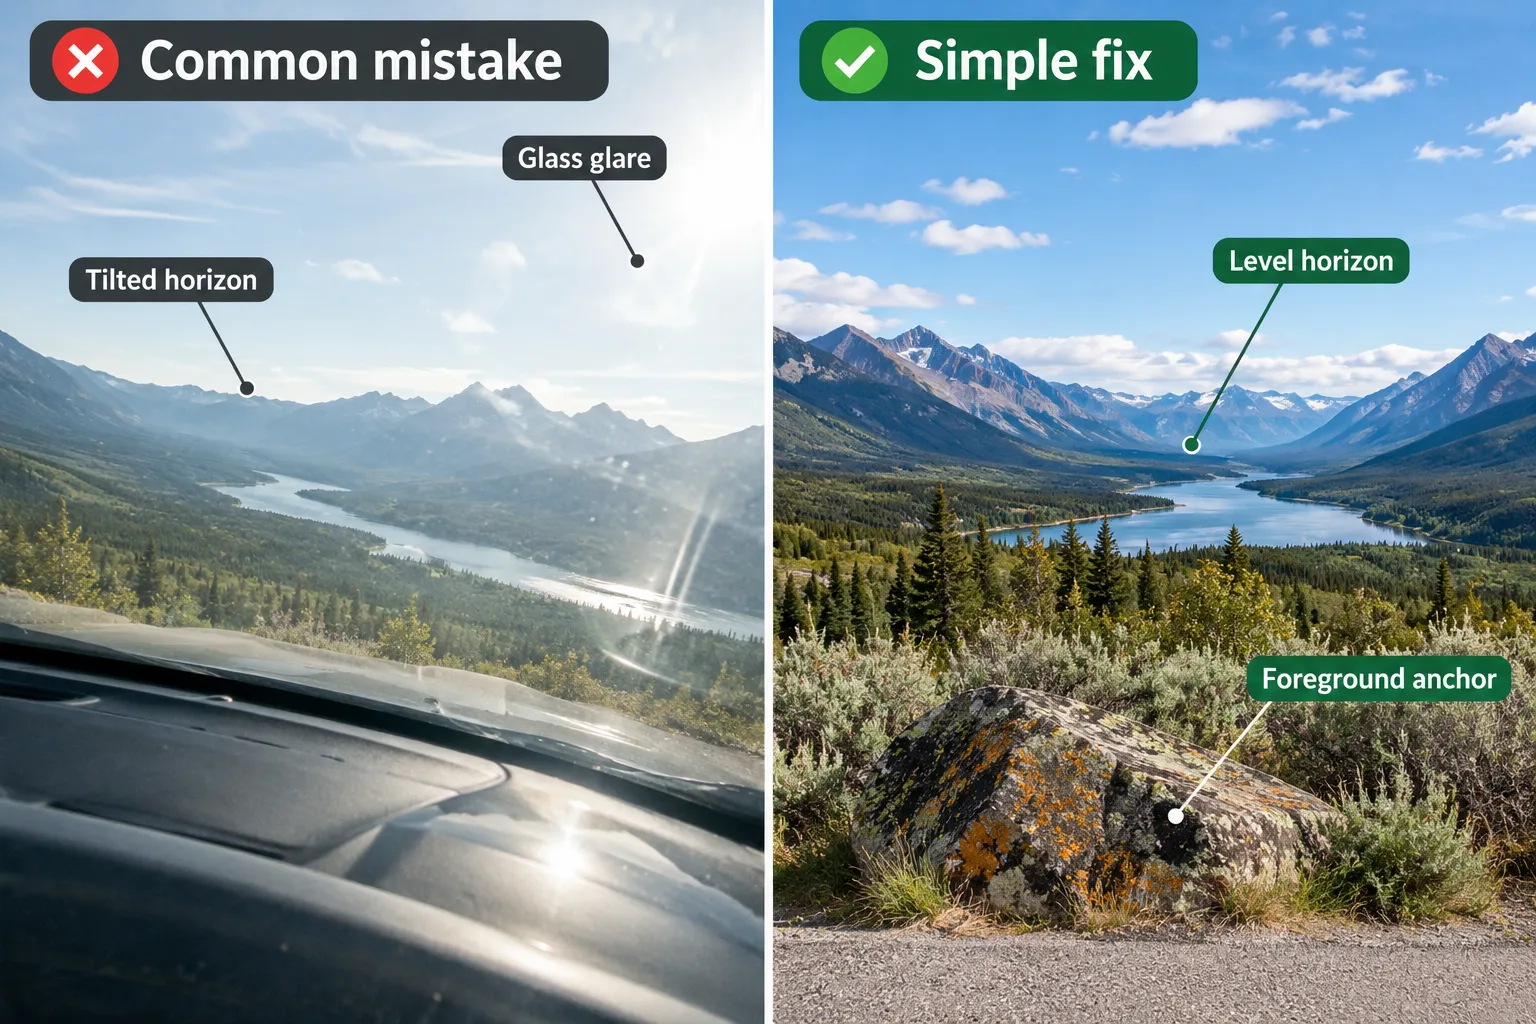
- Choose a safe shooting position. Step out only when it is safe. If you must shoot through glass, keep the lens close without touching it and avoid reflections as much as possible.
- Wipe the lens. Road dust and fingerprints cause that milky haze you notice later.
- Find a foreground. A boulder, a fence line, a curve of sagebrush, or wildflowers within 6-10 feet of you turns a flat view into a photo with depth.
- Level the horizon and take three frames. One wide, one medium, one detail. Compare them later to see which tells the story best.
Safety rules that actually matter:
- Stay behind railings and on hard surfaces near canyon rims. Grand Canyon's park guidance tells visitors to stay at least six feet from the edge and use designated pullouts for photography.
- Never stand in the traffic lane or on a blind curve, and don't open a door into the road.
- Follow each park's wildlife distances. In Yellowstone that means at least 25 yards from bison, elk, and most wildlife, and 100 yards from bears and wolves. Rangers can and do close pullouts when visitors crowd animals. For more on doing this well, see our guide to wildlife spotting in U.S. national parks.
- Stay on boardwalks in thermal areas. The ground near hot springs can be a thin crust.
Check access before every trip: Seasonal road closures, fire recovery, construction, shuttle rules, and vehicle restrictions can change which viewpoints you can reach. Use the current alerts on the official page for each park, especially for Glacier’s Going-to-the-Sun Road, Yellowstone’s interior roads, and Grand Canyon’s North Rim. Do not build an itinerary around an old reopening date.
Watch: Grand Canyon National Park: Plan Ahead and Prepare
A supporting video for planning a park visit safely. Pair it with current park alerts; this is preparation advice rather than a photography lesson.
What camera settings work best for landscape photography at overlooks?
For a dedicated camera, try aperture priority, f/8, and a low ISO as a starting point. Check the shutter speed before shooting handheld. Focus on your main subject and review both nearby details and distant scenery for sharpness; focusing a third of the way into the scene is not a guarantee. Adjust for your lens, sensor size, available light, and subject movement.
For help choosing what to carry, see our guide to cameras for national park trips.
A camera I own: The Canon EOS R50 fits this section as an interchangeable-lens option for learning exposure and photographing scenic viewpoints. Choose a lens suited to your subject; check the listing to see which lens, if any, is included. Check the Canon EOS R50 on Amazon.
Camera checklist:
- Aperture: try f/5.6 to f/8 first, then f/11 if more depth of field is needed. Very small apertures can soften fine detail through diffraction.
- ISO: keep it as low as light allows. At dawn, raise ISO before you accept a blurry frame.
- Shutter speed: for static scenes, try 1/(2 × the full-frame-equivalent focal length) as a starting point, then inspect sharpness. At 50mm equivalent, that is about 1/100 second. Wind and moving wildlife may require much faster speeds.
- Exposure: protect the bright sky. Dial in −1/3 to −1 stop of exposure compensation when shooting toward the sun.
- File format: shoot RAW if you plan to edit; RAW + JPEG if you want ready-to-share files too.
- Filters: a circular polarizer cuts haze and deepens skies. A neutral density filter allows longer exposures for blurred water in daylight.
- Stability: a tripod or a beanbag on the car door rail helps enormously at dawn and dusk.
Smartphone checklist:
- Clean the lens first. Every time.
- Turn on the grid and level the horizon.
- Use the main (1x) lens for most scenes; use the ultra-wide only when you have a strong foreground, because it shrinks distant mountains.
- Use your phone’s native camera lenses when possible. Some zoom buttons use a sensor crop rather than a separate optical lens; heavy digital zoom can reduce detail.
- Tap to focus, then drag to lower exposure slightly so bright clouds keep detail.
- Shoot in HDR/auto and hold still for a beat after the shutter.
- If your phone offers ProRAW or RAW, use it for high-contrast overlooks.
Common mistake: letting the phone pick a night mode at dusk while you hold the phone one-handed. Brace against a wall, a railing, or your car roof.
Watch: Photography Basics in 10 Minutes
New to camera settings? Use this general photography tutorial alongside the checklists above.
Do I need a telephoto lens for national park photography from overlooks?
No. A phone’s main camera or a standard zoom can handle many scenic views. Try different focal lengths: a moderate view can emphasize distant features that an ultra-wide lens makes look small. A telephoto becomes useful in two cases: wildlife and compressing distant layers of ridgeline or peaks.
- Skip the telephoto if you're photographing valleys, canyon panoramas, and rock formations from marked overlooks.
- Bring 70-200mm (or a 100-400mm) if you want bison in Hayden Valley, bighorn sheep along the Badlands Loop Road, or tight studies of hoodoos and canyon walls.
- Never use a long lens as an excuse to get closer. The distance rules apply regardless of your gear, and no photograph is worth disturbing an animal or risking an injury.
For distant wildlife, 300mm equivalent or longer can help, though no focal length guarantees a close-up from a safe distance. If that's out of budget, shoot the animal in its landscape instead of trying to fill the frame.
For distant subjects: I also own the Nikon COOLPIX P1100. Its long built-in zoom makes it relevant to wildlife and distant landscape details from designated pullouts. It is a bulkier option, and steady support becomes especially useful at high zoom. Always maintain the required wildlife distance. Check the Nikon COOLPIX P1100 on Amazon.
Can you get professional-quality photos without hiking in national parks?
Yes. A roadside viewpoint can provide the scenery and light needed for a photograph worth printing. What separates a professional-looking photo from a forgettable one is timing, a clean horizon, a considered foreground, and careful exposure, none of which require distance walked.
Three things that raise quality immediately:
- Return to the same overlook twice, once at midday to scout and once at golden hour to shoot.
- Work the scene for ten minutes instead of ninety seconds. Try another position within the designated viewing area. Change camera height if comfortable. Include a nearby detail without leaving the path.
- Edit lightly. Straighten, crop, add a little contrast, lift shadows, and stop. Heavy-handed saturation is the giveaway.
When you have a set you're proud of, a real gallery beats a camera roll; here's our walkthrough of SmugMug for photographers if you want a place to host and sell prints.
How do you avoid crowds at popular national park photo spots?
Try an earlier or later visit, a weekday, or a less famous designated overlook. Crowds vary with the park, season, weather, and tour schedules. Iconic sunrise and sunset locations can still be busy, so keep a backup stop in mind.
Specific tactics that work:
- Consider sunrise. It can be quieter at some viewpoints, but famous sunrise locations still attract crowds.
- Plan meals around the light. Check sunset time for your travel dates; an early meal may free up your evening.
- Use the secondary pullout. A less famous designated overlook may offer a quieter place to compose your shot.
- Visit in shoulder season (late April, May, late September, October) where roads are open. Confirm seasonal openings first; Glacier's high road and Yellowstone's interior roads open and close on their own schedule.
- Rainy and overcast afternoons can offer softer light and fewer visitors. Leave exposed viewpoints if thunder or lightning develops.
- Look away from the headline view. At any overlook, turn 180 degrees. There's often a good photo behind you with nobody in it.
Common mistakes people make photographing national parks from cars
Common mistakes include shooting through the windshield, parking outside designated pullouts, tilting the horizon, and over-zooming with a phone. Each can affect either your safety or the quality of your photos.
| Mistake | Why it hurts | Simple fix |
|---|---|---|
| Shooting through glass | Glare, softness, reflections | Step out only if safe; stay inside near wildlife |
| Dirty lens | Hazy, low-contrast files | Microfiber wipe at every stop |
| Tilted horizon | Makes the scene look unintentionally tilted | Turn on the grid; straighten in editing |
| No foreground | Flat, "I was there" snapshot | Include an existing rock, plant, or fence; stay on the path |
| Excessive digital zoom | Mushy, pixelated detail | Stay in optical range; crop later |
| Blown-out sky | Unrecoverable white areas | Lower exposure −1/3 to −1 stop |
| Parking on the shoulder or vegetation | Unsafe and against park rules | Use marked pullouts only |
| Crowding wildlife for a shot | Dangerous, illegal, closes pullouts | Use a long lens or keep the animal small in frame |
| Only shooting wide | Everything looks the same | Take one detail shot at every stop |
Edge case: in winter or early spring, a pullout can be plowed but icy right where you'd stand. Keep traction devices in the car if you're chasing cold-weather light.
A small packing checklist for easy-access park photography
For a lighter camera bag: The Sony RX100 VII is a compact camera I own that fits the idea of carrying less between the car and an overlook. Its built-in zoom lets you adjust your framing without carrying interchangeable lenses. Check the Sony RX100 VII on Amazon.
Keep it light enough that you actually carry it from the car.
- Camera or phone, with enough free storage; back up photos before deleting anything
- Spare power: extra battery for a camera, power bank for a phone (cold drains both fast)
- Extra memory card, plus a way to back up files; see this Beikell micro SD card reader review
- Microfiber lens cloth (two, honestly)
- Water, enough for the weather and time away from reliable refills; carry extra in the car
- Sun protection: hat, sunscreen, sunglasses
- Small tripod if you plan dawn, dusk, or night shots. Our comparison of 74-inch Mactrem and Victiv tripods covers budget full-height options.
- Layers and a windbreaker: exposed overlooks can be windy and colder than nearby sheltered areas
- Downloaded park map for spots without cell service
- Printed or saved list of your planned pullouts, in driving order
FAQ
Is a phone camera good enough for national park photos?
Yes, for wide scenic views. Modern phones handle bright landscapes very well. The limits show up with distant wildlife, very low light, and large prints. Clean the lens, use the main lens, level the horizon, and avoid heavy digital zoom.
Do I need a tripod?
Not in daylight. A tripod helps with low-light scenes, night skies, and long exposures. Many daytime panoramas work handheld. Choose support rated for your equipment and keep walkways clear.
How do I find viewpoints with minimal walking?
Open the park's official nps.gov page and look for "scenic drives," "overlooks," or "accessibility." Park newspapers and official maps mark overlooks with a symbol, and accessibility pages state which ones are paved or have steps. Then call the visitor center to confirm current conditions.
What's the difference between a short walk and a wheelchair-accessible viewpoint?
A short walk just means a small distance. Wheelchair accessible means the route meets accessibility standards: firm, stable surface, manageable grade, no steps, and usually designated parking. A 100-foot path can still include a curb or a stairway, so check the wording on the park's page.
Which national park is easiest to photograph without hiking?
Badlands National Park is a strong answer. The Badlands Loop Road strings together many paved overlooks, the rock formations are dramatic from the roadside, and the light is good at both ends of the day.
Can I photograph wildlife from my car?
Yes, and the car is often the safest place to be. Pull fully into a pullout, stay inside when wildlife is nearby, maintain the required distance, and never stop in the traffic lane. If an animal approaches, stop photographing and maintain distance safely; follow ranger instructions.
Are drones allowed for park photography?
Plan for ground-level photography. NPS generally prohibits launching, landing, or operating drones from NPS-administered lands and waters without authorization. Check the specific park’s rules; recreational use is normally prohibited.
What if I arrive at a viewpoint and the parking lot is full?
Do not park outside designated spaces. Continue to another legal stop and return later if practical. Parking turnover varies, so keep a backup viewpoint on your list.
Do I need a permit to photograph in a national park?
Usually not for a small, low-impact visit. Under current NPS filming and photography guidance, groups of eight or fewer generally do not need a permit if they use only hand-carried equipment in public areas, need no exclusive use, cause no adverse effects on resources or visitors, and create no additional administrative costs. Commercial and personal photography are treated alike under these rules. Contact the park if your activity falls outside those conditions; other permits or authorizations may still apply.
Conclusion: plan the light, not the mileage
National park photography without hiking starts with a suitable viewpoint, safe parking, and time to notice the light. Choose stops that match your walking needs, check access before leaving, and take a few carefully composed photos at each location. A memorable image does not depend on a long trail.
Your next steps:
- Pick one park with a strong scenic drive: Badlands, Bryce Canyon, Grand Teton, or Glacier.
- Open that park's official nps.gov page and write down 5-8 named overlooks in driving order, noting surface and steps for each.
- Check the conditions and accessibility pages, then call the visitor center about parking and closures.
- Schedule one sunrise and one sunset at your two best overlooks; fill the middle of the day with detail shots and tighter compositions.
- Pack the short checklist above, and clean your lens at every stop.
Now I'd like to hear from you: what's your favorite easy-to-reach national park viewpoint, the one where you barely left the car and still came home with a photo you framed? Share the park and the overlook name so other readers can add it to their route.
References
- Badlands accessibility and boardwalks
- Yellowstone photography and wildlife watching
- Yosemite Tunnel View access
- Bryce Canyon viewpoint distances and accessibility
- Glacier Wild Goose Island Overlook
- Grand Canyon photography and viewpoint guidance
- NPS filming, photography, and audio-recording permits
Meta title: National Park Photography Without Hiking: Easy Viewpoints
Meta description: Find eight national park photo stops without long hikes, plus access notes, camera tips, and the best light for photographing scenic overlooks and roadside views.
Tags: national park photography without hiking, scenic overlooks, roadside photography, easy national park photo spots, accessible national parks, Badlands National Park, Yellowstone photography, landscape photography tips, senior travel photography, smartphone photography, scenic drives, mobility-friendly travel
Founder of Travel Camera Truth and Big T Honest Reviews, sharing honest, practical camera and travel-gear guidance based on real-world use.